Kat Enters the 21st Century

A new educator's first foray into modern media

Page 2 of 3

Teaching Climate Science with Windy

What is Windy?

Windy is an app (available free for Android and Apple users – with no ads!) developed by a Czech kite enthusiast as a way to visualize weather models. It’s also available in browser format, which I’d highly recommend using for demonstrations and screen captures. It’s an amazing and versatile app that could be used to learn about Earth’s weather systems, climate change, and the nature of predictive models. It’s used daily by sailors, surfers, governments, disaster-relief organizations, storm-watchers, and anybody who wants to know the weather. I use it to check forecasts before boating or doing field work near the water, and sometimes I just have it running in the background because it’s a beautiful interface and it’s fun to watch hurricanes and typhoons form and move before my very eyes!

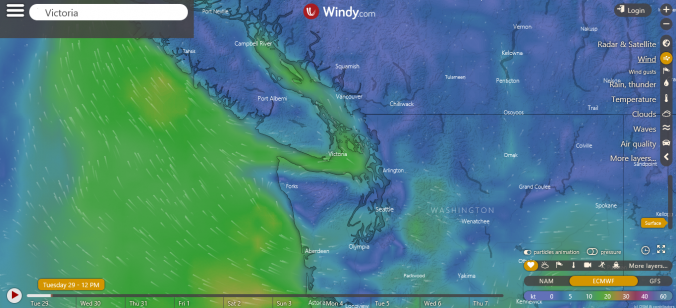
Explanation of the most commonly-used parts of the Windy interface. Screen capture and labels by me.

Using the interface, you can toggle on/off a variety of layers including wind speed/direction (including particle motion animation), rain/snow accumulation, cloud cover, barometric pressure (with colour and/or isobars), humidity, tide level, and others. You can also toggle on/off the locations of airports, popular surfing spots, weather stations, ports and marinas, etc. You can search for locations, although I’ll caution that the fine-scale accuracy (accounting for the presence of islands, mountains, etc. within a city) is rather poor – it’s mostly used for wider-scale predictions. The user uses the same types of motions to zoom in and out or move around the map as is used in most mapping programs, including Google Maps, so it’s really intuitive. The units of measurement (precipitation, wind speed, etc.) are customizable, so you can set it to metric or imperial units if you wish. You can even change the altitude, so you ca have a look at how the pressure changes 2 km above us, or visualize the Gulfstream, or look at the ‘top’ end of a hurricane.

Using it in Class

I can think of a dozen ways to use Windy off the top of my head, but here are some ideas to get started:

  • Current events. As part of a unit on weather or climate change, get students to find a weather-related news story from somewhere in the world and use Windy to visualize it and show the class.
  • The fallibility of models. To help students understand that weather models are predictive but not deterministic, get them to check Windy each day from Monday to Thursday and write down what the app says the weather will be on Friday.  In fact, Windy allows you to switch between different models to compare them. The students will notice that the prediction changes each day, and that the prediction might not be completely correct when Friday rolls around. This helps them understand that any predictive model is only as good as the inputs, and that the results may not be what is predicted. Despite the pretty pictures, Windy is not showing what happens; it’s showing what is predicted to happen.
  • Place-based learning. Ask students to report about a particular place in Canada, and what the climate of that place is. They can use Windy to illustrate their reports.
  • Demonstrations of real-life phenomena. This is where screen-capture technology comes in. Rather than illustrating concepts like pressure differentials, Coriolis effect, front systems, and energy movement around the Earth, why not show students using a dynamic tool like Windy? Screen captures from Windy can ask students to play along on their phones, or just observe as the teacher demonstrates textbook concepts with real-time predictions of hurricane formation, El Nino, the Gulfstream, prevailing wind directions, and the effect of the ocean on coastal climate?

This app can be used in other contexts than science (art comes to mind, as well as geography). I highly encourage you to download this app and play with it. While this is not formally part of my EdTech inquiry on environmental apps for place-based learning, I’d like to highlight it here regardless. No pros and cons list for this app, because there are so few real cons!


ePortfolios and Individualized Learning

It’s All About Choices

I first heard about strategies for individualized learning when I was a biology lab TA at Western Washington University, while pursuing my M.Sc. It was being applied to upper-level biology classes at the time, to mixed success. When I began teaching secondary field school at Bamfield Marine Sciences Centre’s field trip program, individualized outcomes were the norm: students were encouraged to show their learning in a variety of ways depending on the instructor, the group, the setting, and the material. Often, my fellow instructors and I allowed different students to use different modalities. The catch is, none of our activities were graded or held to a curricular standard.

Over the last couple of months, I’ve learned a ton of strategies for translating individualized evidence of learning into standardized grades, and using it to fulfill curricular requirements. PSII provided an excellent example with their ‘percent completion’ and four-point status scale (I think emerging-developing-proficient-enriching?) instead of letter grades, which only get translated to grades at the end of the year to satisfy BC requirements.

ePortfolios make learning visible AND  transparent

Photo from App Store.

I recently had a field trip to Lansdowne Middle School, where we spoke to Vice-Principal Hilary Braid-Skolski and 6th-grade teacher Meaghan Abra about the school’s focus on individualized learning, and how they have expertly used ePortfolio platforms to weave individualized learning into curricular competencies, parent involvement, teacher feedback, student metacognition, and inquiry-based practice. It was the most concrete lesson I’ve had yet on how to actually DO inquiry-based and individualized learning inside the public school paradigm, and it really changed my thinking about how accessible this kind of system could be to me as a high school science educator. Both of our hosts were able to speak to the reality of converting ePortfolios into grades, and were blunt about the fact that inquiry-based practice needs to be scaffolded carefully at first.

One of the first assignments to go up on FreshGrade has very concrete instructions. As learners get more familiar, this scaffolding is slowly removed.

The software that Lansdowne uses (which our hosts hastened to say is not the best system, but is what they can work with right now) is FreshGrade. Ideally, I think Lansdowne would eventually like to develop their own system like PSII has, but for now FreshGrade is working alright for them. We were able to get a comprehensive run-down of the platform, including the back-end setup, to a point where I feel comfortable exploring it on my own. There are even helpful flowcharts and checklists on the walls of Meaghan Abra’s classroom that her students (and the pre-service teachers) can refer to when they submit work on FreshGrade!

Self-assessment criteria for students. Photo taken by me, with permission.

Reminders for students about what should be included in the metacognitive reflection that goes with their FreshGrade submissions. Photo taken by me, with permission.

This kind of concrete skill development is what I want more of from this program! The trip to Lansdowne helped me put a lot of loose puzzle-pieces of pedagogical techniques I’ve been learning and slot them satisfyingly into place, because it was based in learning a tool, instead of more abstract theory that we’re meant to apply on our own.

Look out FreshGrade, I’m coming for you!

EdCamp and Un-Conference for Collaboration

Like a Conference, but Better

Today in EdTech we practiced a ‘mini-EdCamp’ design. EdCamp is a design for a casual conference that has a bottom-up or ‘un-conference‘ design. I have participated in a few un-conference events before, as they’re very trendy now, especially in education. However, I’ve never participated in an ‘EdCamp-brand’ conference. I look forward to participating in them once I’m working in a district. If the district doesn’t typically run an EdCamp, I’ll be organizing one early in my career.

Side Story

PEEC 2019 Participants. Photo by pacific_eec on Instagram. Used with permission.

Little known fact about me: running peer conferences is something I both love to do and have a ton of experience with. Have you heard of the Pacific Ecology and Evolution Conference (PEEC)? I was the lead organizer last year (no big deal). While it gets restructured every year, and the topics are influenced by the papers that participants submit, it’s a really inclusive research conference and not as amenable to bottom-up control, as we’d hate to exclude presenters because their field was not ‘voted up’.

I also attended Science Talk ’19 this past year, which was built on a digital un-conference model. Several months before the physical conference in Portland, OR, the organizers sent out calls to the sci-comm community to send in topics they are interested in, and they collate them into discussions and workshops, as well as bringing in speakers and panelists to speak to the ‘hot topics’. There are still keynotes and presenters, but it’s a much more organic, participant-controlled feeling. I’ve been to a lot of science conferences, but meeting some classroom teachers at this science communication conference was what gave me the final push into becoming a K-12 educator. This year’s conference interferes with the PDP program, but I cannot wait to go back and represent K-12 educators once I’m working in a district!

Back to Our Mini-EdCamp

Low-tech survey methods to choose our sessions. My photo.

We did a one-session version of the EdCamp model, which is done in a single day with sticky notes and not topics submitted ahead of time. In this model, there are no speakers brought in, and no presenters – just groups of peers discussing topics that they care about, and generating good ideas. The topic I chose to participate in was ‘Mindfulness Practice in the Classroom’. It turns out that we had a lot of expertise in the room, and we were able to better define ‘mindfulness’ as well as separate the benefits (and possible drawbacks) from the buzzword that it has become. We even talked about some best practices for using mindfulness in the classroom, including student buy-in and authenticity. A couple of us fell into the role of facilitators, and I think we all got something valuable from the discussion. It was also nice to have somewhat-unstructured time to talk frankly and casually with my fellow teacher candidates, which is another benefit of unconferences – the ability to make genuine connections with colleagues or speak with your coworkers outside of ‘work time’. That social aspect is crucial in a workplace, and I like that unconferences are free and not held during working hours – you’re off the clock!


Hoop Check-In – Week 7

I had another very productive (and exhausting) session with my instructor this weekend, and realized something important: I need to videotape my performances at the beginning of class, and not the end of 90 minutes of working hard. I was so exhausted that I thought I should record only a short, easier part of the routine – I wasn’t sure I could make it through the whole thing again and make it look pretty.

I also cut in the song that I’ll be performing to. The song is called On the Arrow, and it’s performed by Rachel Rose Mitchell. She is a fantastic artist, and creates beautiful music all on her own, with a single voice and her own musical skill. This song is a cover of the song by the same name by AFI, but Rachel has an amazing discography of her own independently-written songs as well. Check her out!

And now, my video of Week 7:

LifeScanner: DNA in Action

What is LifeScanner?

LifeScanner is an app that works with the Barcode of Life Database (BOLD Systems) at the University of Guelph. It includes a database of all the specimens collected all over the planet, as well as kits that allow users to send in their own specimens. I’d like to propose that it has the potential to be used not just to identify species, but as a tool to address essential questions related to biology and inter-curricular inquiries.

Photo by Mike Beauregard on Flickr (under CC BY 2.0).

How can it be used for education?

The app itself can be used to identify species, look up animals that live in your area, and learn about the biodiversity in your backyard, region, or country. With the collection kits, a class could collect and send in specimens to BOLD for DNA barcoding. By exploring the app, students learn more about some of the applications of DNA sequencing and what it can be used to do, like identify food fraud, discover new species, and track the effects of climate change on animal distributions. A class field trip to a park or beach could include using the app to make and check off a list of commonly found animals, helping the students improve their powers of observation. Or, conversely, students could photograph as many animals as they can find, then check with the app to see which ones they did not find, and hypothesize why they were not found. ELL or second-language students could pick an animal, research it, and give a presentation of what they found, expanding their vocabulary.

Using the kits, students are engaged in exploration to find a specimen, develop photography skills to get a set of diagnostic photos, practice hypothesis development when trying to identify the animal as best they can, and participate in real-life citizen science by contributing their specimens to the worldwide BOLD database, which they can see on their app! Students could also be asked to investigate food fraud by collecting samples of meat or seafood that they suspect is not what is labelled (sushi is great for this).

Pros
  • App is free!
  • Gets students outside exploring their environment
  • Interactive way to learn about genetic technology
  • Students can actively contribute to a body of scientific knowledge
  • Fun way to learn about the diversity of local species
  • Teaches practical skills of observation, photography, search terms in databases
  • Students learn about proper food labelling, and the prevalence of food fraud
Cons
  • Currently only available on Apple devices (iPhone, iPad, etc.)
  • Collection kits are expensive ($50 for 4 collection kits)
  • Animal specimens need to be small enough to fit in the tube or a piece has to be cut off, so the database comprises mostly invertebrate species (i.e. great for bugs or tidepooling, but not birding)
  • To collect whole animals, they do have to be sacrificed. This is a moral dilemma that should be discussed as a class, and students should not be required to collect specimens.
Curricular Areas

LifeScanner applications could be used for Science 9/10 (exploring local biodiversity), Life Sciences 11 (DN sequencing, biodiversity, and taxonomy), social studies (food labelling), art (photography, biodiversity), and ELL/second languages (learning French/Spanish words for animals, practicing communication), and math (point sampling, survey methods).


Hoop Meets Pedagogy

An Ode to Eve

We did no new material in EdTech today, so I thought I’d take a moment this week to talk about something that I’ve learned through my Free Inquiry project, and it isn’t about hoop: it’s about teaching. Having been practising at another studio for a month now, I’ve really missed my weekly classes with Eve and my classmates. I’ve taken a moment to examine why that is, and I’ve been able to link it to what I’m learning about teaching and pedagogy here at UVic.

As I’ve mentioned before, I am not the most graceful, flexible, or athletic person. If I had started practising aerial arts at the studio I’m with now, I wouldn’t have lasted a month – I always leave there feeling weak, inadequate, and clumsy. But I’ve stuck with Eve for over a year, and every time I leave her class I feel strong, empowered, and accomplished. Her classes are a safe, supportive, personalised learning space, where everybody is valued and encouraged to try their best, regardless of their abilities. If I can reproduce even a fraction of that feeling in my students, I will be doing my job as a science teacher. Here are some ways in which Eve, who is not a trained teacher, has shown me to be an effective educator:

Know and use names

Image by Clker-Free-Vector-Images on Pixabay

It’s so basic, but so important. At the beginning of every class, regardless of who is there, Eve goes around the room and introduces us all by name. It shows that she knows our names, even if it’s our first class. It also makes sure that we all know each others’ names. This avoids the awkwardness of the I’ve-been-coming-here-for-weeks-and-I’m-bad-at-faces-but-it’s-too-late-to-politely-ask-your-name-again game. Even the worst person with names will eventually learn all the regulars because of the repetition week after week.

Do cool stuff right away

One of the first moves I learned!

In Eve’s class, we do a warm-up all together, then go right into learning combos. At other studios, we drill on techniques. We practice the same thing again and again, and if you don’t get it or aren’t strong enough, you have to watch everyone else master it while you wait your turn to struggle again. There is no payoff. With Eve, you learn things right away that look really cool, even if they’re relatively easy. You catch a glimpse of yourself in the mirror and think ‘I look like a lyra performer!’ even if you’re still on the basics. This increases confidence, self-efficacy, and interest. I wanted to learn more, and felt good about what I was already able to do.

Keep everyone focused on their own progress

Photo from Wikimedia Commons. Public domain.

In Eve’s studio, there are only as many people as there are hoops. That means that everybody gets their own hoop, set to the height that they prefer, and everyone practices the moves together. Very importantly, this means that I’m not looking at anybody else – I’m focusing on getting through the moves myself, and the occasional glance at others when I need a reference is not competitive. I’m not watching others and comparing myself to them – we’re all doing it together, and focusing on doing our personal best.

Offer choices and modifications to accommodate different levels

Image by Dan Moyle on Flickr (under CC BY 2.0)

Every move we do with Eve, she offers both an easier way, for those who don’t have the strength or flexibility yet, and a more challenging option, so you can push yourself if you feel like you’ve mastered the move. That way, nobody’s bored and nobody feels left behind. The language she uses is key: instead of saying “beginners can do this, advanced can do that”, she offers a move, then follows with “…if it’s available to you”. Not “if you can do that”, but “if it’s available”. In this way we learn to listen to our own bodies, and determine if that particular challenge is available to us. If I can’t do the splits, some things are not available to me, but it’s not like I’m being lazy or I’m not good enough yet. It’s simply unavailable to me at this time. I would like to adopt this phrase, or something like it, to use in my classes.

Create and hold space

Image by sciencefreak on Pixabay.

Eve also teaches yoga, including aerial hammock yoga, and she ends every one of her yoga classes with a savasana (‘corpse pose’), including a guided mindfulness meditation. These meditations invite the class to turn inward and find a place to relax away from the stress of the day. In my most stressful, traumatic times, Eve’s classes were a shining light in my week. I would do an hour of yoga, finishing with a meditation, then launch into an hour of fun in the hoop. I left energized and completely at peace. Everybody in the class seemed to have a similar reaction, and it allowed us all to gather closer as a collective. I have shared stories, woes, aches, pains, and shared smiles across the room with the women in that class, even though none of us are friends ‘in real life’. Eve’s studio was a bastion for me, and I started referring to it as my ‘upside down women’s circle‘. More than a form of exercise, these evenings were a spiritual oasis for me. I won’t aspire to that for my high school science students, but if I can create a similar safe space for them to share with each other and with me, then I am doing the job I have set out to do.

Hoop Check-In – Week 6

The Path So Far

I’d like to take a moment, halfway through this free inquiry project, to say that I’m learning a lot. This is not my usual way of learning: as an academic, I have had few opportunities to track my learning in certain skills, as opposed to concepts. Learning to do something has different metrics than learning to know something. Back in September, I enjoyed playing in the hoop or trapeze or silk hammock, but had no idea how one would actually perform such a thing. I knew a few cool poses, and had built up some strength, but until I started watching videos of performers late one Friday night, I hadn’t dreamed that I could put those moves to music, let along choreograph a whole song!

Look at this goober.

Undergoing this free inquiry has helped me understand that ‘learning’ doesn’t have to be reading peer-reviewed articles or writing a paper. It turns out that video editing isn’t as daunting when you’re editing a video of you having fun and doing something cool! My biggest sources of knowledge in this endeavour have been my instructors at Island Circus Space, where I’ve been practicing weekly, and my amazing mentor Eve Carty, who has taught me not just hoop combos but how open pedagogy can be as easy and natural as breathing. The structure for my project came from a dance blog that breaks choreography down into 6 steps. Those steps have been working really well to structure my process, and so far I’ve completed four steps:

  1. Pick a song and listen to it like crazy (I actually did this twice, as I’ve since switched my song to On the Arrow by Rachel Rose Mitchell [a cover of the original by AFI])
  2. Get actively inspired (by watching videos of others, talking to my instructors, and listing the moves I could do so I could put them in order)
  3. Freestyle! (At practice every week, I got the feeling of new moves and new ways to combine and move between ones I already knew)
  4. Piece combos together by ‘chunking’ (I did this by first choreographing moves to pieces of the song that were really poignant or important, or to certain lyrics that spoke to me. After that, I filled in the rest of the song)

Next Steps

There is no way to not make this look awkward.

The next two steps will be covered over the following weeks:

5. Polish execution of the moves (in free jam sessions with Eve, I’ll drill the choreography and film it for my reference so I can make it look awesome)

6. Make edits – but not too many (If there are moves that I’m not as comfortable with, or that take longer than I expect to get into even with practice, I might have to adjust the choreography a bit)

In addition, I’d like to do an audio interview with one of my instructors so I can work on my audio editing skills. I’m still attending weekly practices and biweekly sessions for filming, and I am amazed at how this project is coming together. I’ll check in next week with another video, this time hopefully my first attempt at the full song!

Citizen Science and Place-Based Learning: eBird

I am what you would call a pre-amateur birder. I like birds, and from my time as a marine biologist I can easily identify several birds that are common on the water, as well as some that are more common on land. I don’t own a pair of binoculars or a telephoto lens, but I do own a Sibley bird guide which I sometimes bring on hikes. But after exploring eBird, I am really excited about using this app in my classes!

Barn Owl by seabamirum on Flickr (under CC BY 2.0)

What is eBird?

eBird is a citizen science bird-reporting app that is produced and curated by the Cornell Lab of Ornithology (CLO), and is supported by Merlin Bird ID (reviewed here by my partner Brigitte). It is free to download on all platforms (supported by a browser edition), can be used offline, and comes in over 30 languages. It has a built-in bird identification interface that links to Merlin, which can be used offline. It’s a way for birdwatchers to keep track of their birding finds, with metrics available to help you track your sightings compared to previous years and months. Once the phone enters WiFi reception again, all these sightings are sent directly to a database monitored by CLO, which anybody can access.

Want to find the best birding sites around Chiang Mai, Thailand? Want to know the hotspots in your area for really rare birds to check off your list? Want to see what time of year people see the most pelicans in your area? All can be found with the database. Scientists use the database to create, modify, and track range maps and migration routes on large and small scales. They can even use the data that this app has generated already to study the impacts of climate change on birds! The best part is that all users can follow one another, so students can look at local users to find good spots for birding. As a teacher, you can also track what your students are seeing (or whether they’re getting their walks in) by following their accounts. See below for an introductory video from the CLO YouTube channel:


How can it be used for education?

As an educational app, eBird has amazing potential for several different curricular areas including science, art, social studies, and even math! It gives an opportunity for students to:

  • Engage with their environment and have an excuse to take their phone on a walk
  • Participate in friendly competition among students for the most birds/rarest birds/most excursions, etc.
  • Contribute in a real way to a body of knowledge that is actually used by scientists and users all over the world
  • Be introduced to the biological and mathematical ideas of point-counts, population ecology, statistical likelihood, survey methods, and identification.
  • Get outside with friends and learn more about what is special about their backyards!
Pros
  • App is free, ad-free, and available on all platforms
  • Easy and intuitive to use
  • Number and length of birding expeditions can be curated by the teacher by following student accounts
  • Can be used with Merlin to identify birds from a photo
Cons
  • Merlin Bird ID must also be installed to use identification service
  • Bird lists (eBird) and ID packages (Merlin) must be downloaded in WiFi range before heading into the field
  • A baseline level of bird knowledge is required by the teacher to check students’ work

Pacific School of Innovation and Inquiry Tour

This week in EdTech we had the opportunity to tour the Pacific Institute of Innovation and Inquiry (PSII), an independent high school that opened in Victoria several years ago and is gaining popularity in the area for its ‘progressive’ approach to education. Being in the school, surrounded by its ~95 learners and seven full-time staff members, reminded me of the Montessori elementary school where I spent the first four years of my education. This nostalgia reminded me that, far from being new, the pedagogical concepts that PSII embraces have been around for many years, and working successfully in elementary programs.

Education research has been aware for decades that teens learn better when they are actively engaged in their learning, and when they can relate their learning to their daily lives and interests. The Montessori model, and schools like it, have proven this to be effective, but only seem able to convince parents that this is appropriate for lower grades. Once kids hit high school, the expectation from students and parents is a switch to the ages-old system of one-room-one-subject designation, specialized teachers, and assessment by exams. This is thought to be the introduction to the ‘real world’, the factory model which would produce workers. As mentioned in the film Most Likely to Succeed, which follows a similar independent school in San Diego, CA, the ‘real world’ no longer works that way, and the skills that students need to succeed are perhaps better reflected at a school like PSII or High Tech High.

A poster on the wall at PSII detailing the competencies that should be achieved through inquiry-based learning. Note the lack of extensive lists of subject-specific PLOs. Image used with permission.

Part of the issue might be that the factory methods are thought of as preparation for university, which is also designed this way. While many aspects of university education have begun to change to a more active learning model, there is by design and necessity still a division of teachers and classrooms between and among subjects. The principal and founder of PSII, Jeff Hopkins (see below for one of his TEDx Talks on the school), stated with confidence that his students are doing well in university with the time management and decision-making skills they mastered at PSII. While I believe him, I would also like to hear more about these successes, and what kinds of changes students experience and struggle the most with going into various post-secondary programs.

For me, the aspect of deja vu aside, I feel the PSII model is intuitive and easy to get invested in. However, I can see the massive challenges in the way, including (as Hopkins pointed out) the basic structural layout of most high schools and the sheer volume of students. He strongly suggested that any more than 90 students would be too many to support effectively, given his small staff, and that larger schools should consider creating learning ‘pods’ to break up the number of students. I am interested to see how PSII continues to thrive, and how other schools and educators can find ways to emulate this learning style without having to wait for large-scale overhauls to the structure of public high schools.

Hoop Check-In – Video Proof

This past weekend, I was reunited with my wonderful instructor Eve Carty and the gang from Amethyst Dance & Fitness, which is still under repairs due to a massive flood in August. Studio 4 Athletics was good enough to give us space to practice, and it was such a relief to see everyone for the first time in a few months. After hooping my heart out for an hour in supportive, easygoing company, I remembered that I was meant to take a video this week.

The video is a bit blurry in the middle, due to the motion, but Eve caught it after only a few moments and refocused. I’ve posted the video below, along with some text commentary. This represents the first moves I’ll be building into my routine, performed when I was already tired, so forgive the sloppiness of some of the moves. I also really messed up a single-knee climb, and managed to tear the backs of both knees to shreds (you can see the exact moment in the video when this happens), which resulted in a bit of a lull in the middle of the combo. Things I learned this week is that when I feel like a move is sloppy, it really does look that way. Also, its looks so much better when I smile, and I need to remember to do so!

« Older posts Newer posts »