A new educator's first foray into modern media

Category: Free Inquiry (Page 1 of 2)

Hoop Check-In – Final Video!

Well, I did my best

I set out this semester to learn how to choreograph and perform a routine in the aerial hoop (lyra) discipline. I came in with some knowledge of my strengths and weaknesses in the hoop, and with some practice under my belt, but with no experience putting together a routine or moving to music in the hoop. Through online resources, the generous help of my mentors and coaches, and listening to that song until I couldn’t anymore, I was able to put together a routine that played to my strengths while also challenging me to improve in my weaker areas. I practiced and practiced, filming periodically along the way, until I arrived at the end of the semester (and the end of my filming opportunities with Eve at Studio 4 until the new year).

This is by no means the best I can do, and I’m going to keep working at it – with a different song this time though! That said, I’m fairly proud of what I was able to accomplish, and moreover, I forced myself a long way toward getting over my aversion to being filmed.

With enormous thanks to everybody who supported, guided, and ooh’d and aah’d me through the process, here’s what I have so far:

Hoop Check-In – Week 10

Posture and Expression

The difference (okay, one of the many, many differences) between where I’m at with aerial arts and where the real pros are is in their ability to use their bodies not just to do the neat tricks, but to express emotion and exhibit fluid motion. I can work on making my moves flow together smoothly, but it takes another level of strength and competence with those moves to use them to really express what you want to show. It’s a literacy all its own that requires facility with the parts, much like poetry or great prose requires automaticity with grammar and vocabulary. One thing I’ve noticed from watching the pros is that they can use posture to make moves look more fluid, or use body positioning to emote without even being able to see their face:

I am working with a very limited vocabulary, and a basic grasp of the grammar of dance and movement. I can’t expect poetry to come out yet, but here are a few things I’m working on right now to push my expression a bit:

Photo by AerialShowgirls on Wikimedia Commons (Public Domain)

Slow it down and lean in

A pop of a hip, a roll of an elbow, or an arch of the back can add drama and emotion to a move. the photo above would look way less appealing or intense if the performer’s head was not thrown back, or if her shoulder wasn’t cocked. You can do a lot with the difference between a flexed or pointed foot, a bent or straight knee, etc. At my level, this means I need to slow down and do every move REALLY hard, like I mean it, instead of trying to flow through them quickly, which makes it look sloppier and less deliberate.

Posture counts

In the video above  featuring my favourite aerial artist on YouTube, you can see how she arches her back to pull up into the hoop, straightens her back to show balance, and sometimes even hunches forward for almost a springboard effect, when she’s about to do something really impressive. I like this idea, and as I work on my back flexibility I’m always trying to be aware of what my posture is doing.

I’ll be doing my final video recording this weekend for a few weeks, so wish me luck!!

Hoop Check In – Week 9

Things I’ve Learned

The semester is drawing to a close, and as I prepare to wrap up my Free Inquiry project, I’d like to take a moment to summarize my learning thus far.

As I’ve stated before, it’s more difficult for me to reflect on my learning and make it visible when I’m working on a physical skill and not academic research.  I’ve been watching and learning, rather than gathering prior research. I’ve been seeking advice, rather than gathering data. And, very importantly, I’ve been gaining an understanding of physical limits (mine and gravity’s), rather than analyzing observations. I’ve learned a lot about my strengths and weaknesses, and how to learn by experience.

Along with my latest progress video (the entire routine through with music for the first time), here are a few practical things I’ve picked up along the course of this project that I think apply to life in general:

  1. You can substitute strength for flexibility when it comes to showmanship…but you still need to work on both.
  2. It is 100% harder to resist gravity when spinning very fast.
  3. You can condition and you can gain calluses, but in order to put on a good show, some things are going to hurt very badly no matter what.
  4. Covering up doesn’t always prevent you from getting burned.
  5. Leaning into every move makes it look more intentional.
  6. Always think of what to do with your hands.

And without further ado, my progress so far:

Video taken by Eve Carty at Studio 4 Athletics. Used with permission.

Hoop Check-In – Week 8

I Blame Dr. Albert Bandura

This week, I’ve switched up my classes at Island Circus Space. I’ve found the classes I was taking weren’t helping me to learn or improve new skills, and similarly were not allowing me time to polish skills I already have, or that I am using for my routine. Dr. Lucinda Brown would be so pleased, because it all had to do with…

Self-Efficacy!

The idea of self-efficacy being important in teaching and learning has been on my radar for some time. As a tutor for UVic’s Learning Assistance Program, self-efficacy training (including the four components of teaching for increased self-efficacy) was part of how we learned to help our students take charge of their own learning. I’ve been hearing about the importance of self-efficacy again in Psychology of Classroom Learning (ED-D 401), and it’s made me realize how little of it I’ve been getting from my hoop and trapeze classes.

Image: Reciprocal Determinism by EDCU320RHT on Wikimedia Commons (under CC BY-SA 4.0).

I started at this studio taking intermediate hoop/trapeze, considering that I had a year of experience in the hoop. It turns out that I’m halfway between their version of ‘beginner’ and ‘intermediate’, and being in a class full of folks that are much more experienced, and only practicing skills that are new to me, has been really impacting my self-confidence with this discipline. I know as a teacher that this is not how I can learn optimally, so I’ve decided to switch up my schedule to take the beginner-level hoop/trapeze class, as well as an extra strength-training class to get me up to speed with the intermediate class. This is a different angle that might yield the same results, but in a way that I can feel much more comfortable with my progress.

I’ve really begun to reflect on how teaching a skill like aerial arts is intrinsically the same as teaching science or English or anything else in a classroom. Once I start thinking about it, the principles of pedagogy start turning up everywhere!

(Featured image: Psychologist Albert Bandura in 2005 from  Fridolin freudenfett on Wikimedia Commons, under CC BY-SA 4.0.)

Hoop Check-In – Week 7

I had another very productive (and exhausting) session with my instructor this weekend, and realized something important: I need to videotape my performances at the beginning of class, and not the end of 90 minutes of working hard. I was so exhausted that I thought I should record only a short, easier part of the routine – I wasn’t sure I could make it through the whole thing again and make it look pretty.

I also cut in the song that I’ll be performing to. The song is called On the Arrow, and it’s performed by Rachel Rose Mitchell. She is a fantastic artist, and creates beautiful music all on her own, with a single voice and her own musical skill. This song is a cover of the song by the same name by AFI, but Rachel has an amazing discography of her own independently-written songs as well. Check her out!

And now, my video of Week 7:

Hoop Check-In – Week 6

The Path So Far

I’d like to take a moment, halfway through this free inquiry project, to say that I’m learning a lot. This is not my usual way of learning: as an academic, I have had few opportunities to track my learning in certain skills, as opposed to concepts. Learning to do something has different metrics than learning to know something. Back in September, I enjoyed playing in the hoop or trapeze or silk hammock, but had no idea how one would actually perform such a thing. I knew a few cool poses, and had built up some strength, but until I started watching videos of performers late one Friday night, I hadn’t dreamed that I could put those moves to music, let along choreograph a whole song!

Look at this goober.

Undergoing this free inquiry has helped me understand that ‘learning’ doesn’t have to be reading peer-reviewed articles or writing a paper. It turns out that video editing isn’t as daunting when you’re editing a video of you having fun and doing something cool! My biggest sources of knowledge in this endeavour have been my instructors at Island Circus Space, where I’ve been practicing weekly, and my amazing mentor Eve Carty, who has taught me not just hoop combos but how open pedagogy can be as easy and natural as breathing. The structure for my project came from a dance blog that breaks choreography down into 6 steps. Those steps have been working really well to structure my process, and so far I’ve completed four steps:

  1. Pick a song and listen to it like crazy (I actually did this twice, as I’ve since switched my song to On the Arrow by Rachel Rose Mitchell [a cover of the original by AFI])
  2. Get actively inspired (by watching videos of others, talking to my instructors, and listing the moves I could do so I could put them in order)
  3. Freestyle! (At practice every week, I got the feeling of new moves and new ways to combine and move between ones I already knew)
  4. Piece combos together by ‘chunking’ (I did this by first choreographing moves to pieces of the song that were really poignant or important, or to certain lyrics that spoke to me. After that, I filled in the rest of the song)

Next Steps

There is no way to not make this look awkward.

The next two steps will be covered over the following weeks:

5. Polish execution of the moves (in free jam sessions with Eve, I’ll drill the choreography and film it for my reference so I can make it look awesome)

6. Make edits – but not too many (If there are moves that I’m not as comfortable with, or that take longer than I expect to get into even with practice, I might have to adjust the choreography a bit)

In addition, I’d like to do an audio interview with one of my instructors so I can work on my audio editing skills. I’m still attending weekly practices and biweekly sessions for filming, and I am amazed at how this project is coming together. I’ll check in next week with another video, this time hopefully my first attempt at the full song!

Hoop Check-In – Video Proof

This past weekend, I was reunited with my wonderful instructor Eve Carty and the gang from Amethyst Dance & Fitness, which is still under repairs due to a massive flood in August. Studio 4 Athletics was good enough to give us space to practice, and it was such a relief to see everyone for the first time in a few months. After hooping my heart out for an hour in supportive, easygoing company, I remembered that I was meant to take a video this week.

The video is a bit blurry in the middle, due to the motion, but Eve caught it after only a few moments and refocused. I’ve posted the video below, along with some text commentary. This represents the first moves I’ll be building into my routine, performed when I was already tired, so forgive the sloppiness of some of the moves. I also really messed up a single-knee climb, and managed to tear the backs of both knees to shreds (you can see the exact moment in the video when this happens), which resulted in a bit of a lull in the middle of the combo. Things I learned this week is that when I feel like a move is sloppy, it really does look that way. Also, its looks so much better when I smile, and I need to remember to do so!

Hoop Check-In – The Process

I have very little new developments to report this week, since I only had time to get to one hoop class and I’ve been held up with other schoolwork. So instead of a check-in video, this week I’m going to share with you a bit of my process. I’ll make up for it next week with (hopefully) some real live footage of me building my routine.

Choreographing a dance, or any kind of routine, is something I’ve never done before. I always thought it was some kind of alchemy that needed an expert to pull off. However, when the only person I’m choreographing for is me, I thought it might be easier since I know what my own limitations are. However, the disadvantage of choreographing for aerial apparatus is that I can’t just practice at home (I’ve been tempted to get out to a local playground and try the monkey bars, but it isn’t quite the same). Whatever advantage I have for knowing my own limits is erased by the fact that, until now, it’s all being done in my head. Trying to estimate the time it takes me to do certain tricks in order to time moves to music is hard when I’m not physically able to try it out.

So, where to start? I started looking online and found a few good resources for amateur choreographers (this one gets special mention), but this post on a blog called Steezy really stood out as something I could work with. They lay out choreography in 6 ‘easy’ steps, all of which apply to the process I’m hoping to undertake. There are helpful fun videos embedded (like the one below, based on Step 4), and some great examples. A good example of a multimodal blog!

The first step (pick a song and listen to it a lot) is completed. I’ve picked a few lyrics in the song that I want to link to my movements, and a few more dramatic points to fit with a fast or slow move.

The second step (get actively inspired) I’ve begun by putting together a list of moves that I can do, and starting to applying them to key points in the song that I think they go well with. Adding emotion is something I’ve been working on in my aerial hammock classes, and I’m still not very good at it. Adding pauses for effect will help to fill out the song and give me breaks, so I’m going to try that as a way to add emotion. For instance, just sitting in the hoop doesn’t look very cool, but if the hoop is slowly spinning and I can portray some drama with arm motions or positioning of my legs, it can work with the song while giving me a moment to catch my breath before the next difficult (and painful) drop or inversion.

The third step – freestyling – I have been doing at my weekly classes by practising skills and learning new ones. I’m hoping to try the routine in a real hoop for the first time at a special session with my instructor. In that space, I will be able to videotape some of my attempts so I can work on my video editing!


Hoop Check-In – Week 2

This week’s task was for me to finalize my pick for a song to choreograph my routine to. It came down to a tight race, but I’ve 90% decided on ‘Hold My Heart’ by Lindsey Stirling. I like the fast tempo, the vibe, and the number of fun drops in the song, and at about three and a half minutes long, it’s a manageable length of time. The music video for the song is below. Full credit to the artist, of course.

See below for my check-in video for this week. I’m starting to really get into aerial hammock, which (as I explain at length in the video) is a slightly softer, comfier version of the hoop that doesn’t produce any bruises, but does produce fabric burns. Combined with my hoop class, I have burns in all the places I don’t have bruises. Gosh, fitness is fun!


Hoop Check-In – Week 1

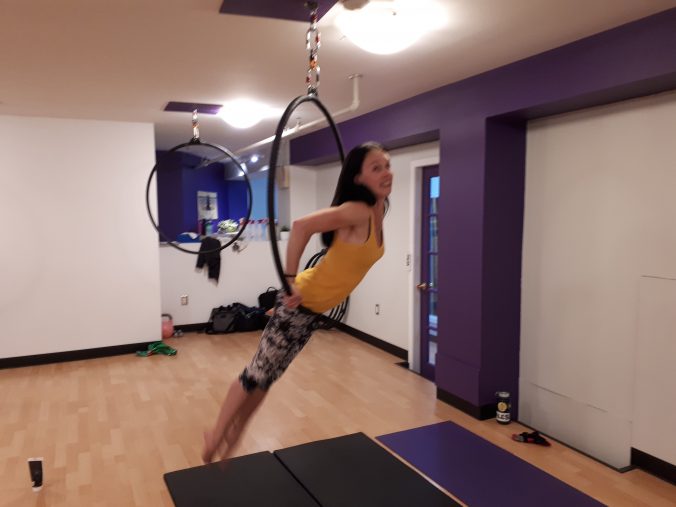
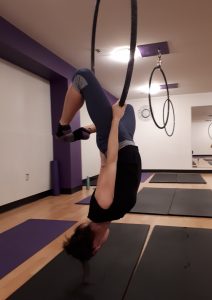
This week I had my first couple of aerial classes after 4 weeks. This is the reality of aerial arts: it hurts. Hanging from a solid piece of metal by a single body part does not feel good; bruises, scrapes, rub marks, and burns are going to happen. You can train yourself to ignore the pain, and you develop calluses on some areas, but part of the art is embracing and accepting the pain. Over the last four weeks, I’ve lost most of my calluses and conditioning, as well as my core and upper-body strength. A single-word description for my life right now would be: ‘ouch’.  My check-in video is below:

The Apparatus

I work with a number of different apparatuses in aerial arts, some of which more (or with more skill) than others. Here is a brief intro to each of them, in case you’re curious.
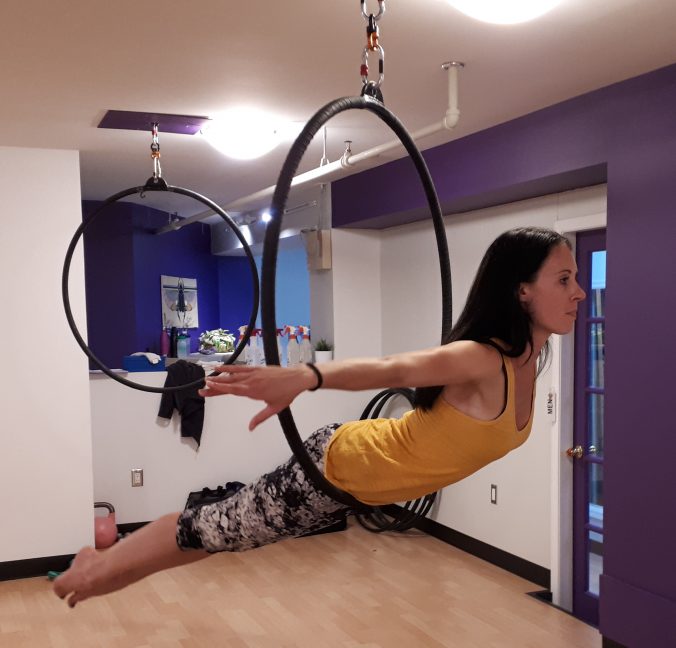
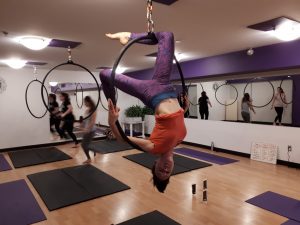
Lyra Hoop

Photo by Leonard Low on Flickr

A metal hoop that hang from the ceiling, usually able to spin. It can have a single hanging point, which is what I work with, or two hanging points, where it’s suspended on the end of two ropes or silks, like in the video I showed in my last post. The difference is in the way you can work ‘over the hoop’. A double suspension allows you to use the hoop more like a trapeze (below). Pros of hoop: looks cool even if you’re not good at it (especially if you spin it). Cons: It’s a hard, curved metal object digging into every part of your body that rests on it.

Static Trapeze

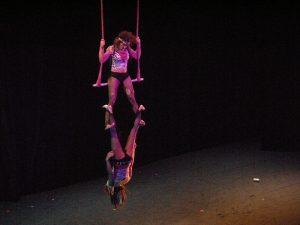
Photo by Joe Mabel on Wikimedia Commons

As opposed to the flying trapeze, which is what most people think of when they hear the word. The static trapeze doesn’t swing and is usually not done with a partner. You don’t switch between them. It just hangs there, much like the hoop. The trapeze is just a single horizontal bar suspended from two ropes, either connected at the top to form a triangle shape, or connected separately, like a swing set. The one I work with is a triangle. Pros: more versatility and ways to show flexibility and technique. Cons: two words. Rope. Burn.

Aerial Silks

Photo by AerialShowgirls on Wikimedia Commons

Two long strips of stretchy fabric that are both suspended from the ceiling. They are incredibly versatile and can do basically anything you can imagine. Pros: No bruises! And they look absolutely stunning if you can get good at them. Cons: working with them requires a baseline of strength and flexibility. Getting good at them is very tough. And just because they aren’t a hard piece of metal doesn’t mean it doesn’t hurt, since you end up trussed up in them and supporting your weight in your ankles or armpits.
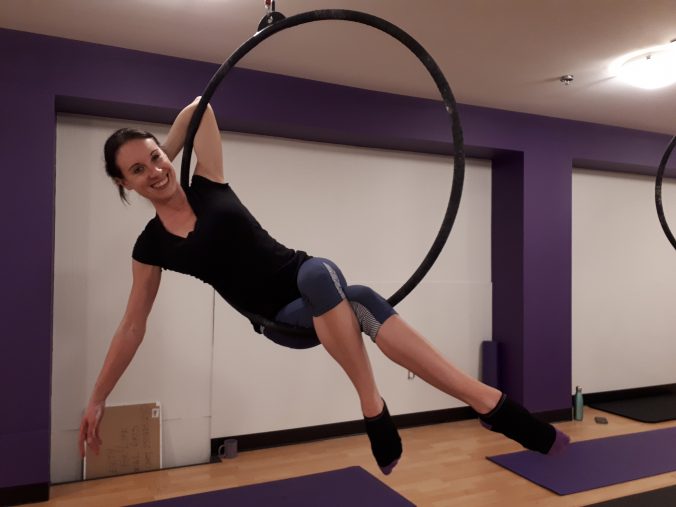
Silk Hammock

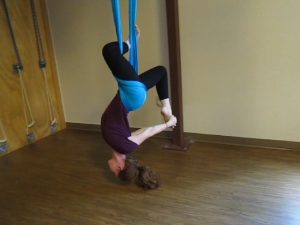
Photo by jenniferdukedodd on Flickr

The same stretchy fabric, but hanging in a loop. It’s like a combination of all the other apparatuses, in that it’s soft like silks, in a loop like the hoop, but hangs in a triangle, like the trapeze. Pros: versatile, comfortable, and can double as an actual hammock to lie in! Cons: In order to do cool-looking moves, there’s a lot of strength and flexibility required. In other words, everything I can do so far looks unimpressive.

I’ll have another video update – and perhaps an interview with my Flight Instructor – next week!


« Older posts